Wudang Weng Shun Kuen
Notes Taken From Special Classes of Ian Garbett By Private Secretary Corey Stanley
Preparation for the Punch to Stand in theYee Jee Keem Yeung Ma, the Mother of all Stances
Start with your feet together and your arms by your side in a relaxed manner (Wu Chi). The feet are turned out 45 degrees on the heels. Then turned out another 45 degrees on the toes (on the balls of the feet as the heels brush lightly as the position’s gained). Initially beginners are made to turn the full 45 degrees, but as advancement occurs, the feet can be anywhere between 30-45 degrees as long as the heels are wider than the toes. There should be tension in the knees towards each other so that the knees are a fist distance apart. The next stage is to “sit” into the pelvic region, which is then pushed forward and up. The back of the head should line up with the back of the heels. This should create a sensation of “leaning” backwards, but is due the head lining up with the heels. During practice sessions the anus should be clenched.
This stance is sometimes called "The Goat Restraining Stance" because of 3 principles:
| A. | The knees are pushed together as if holding a goat between them. |
| B. | The pelvis is pushed forward to stop the goat pushing against you. |
| C. | You are leaning back to stop the goat pulling you forward. |
This is also why the feet are splayed, as it is hard to pull or push in this position.
Preparation for the Fist Clenching
The hands are lifted up so the palms are upwards. This is when the 1st stage of clenching is done (see figure):
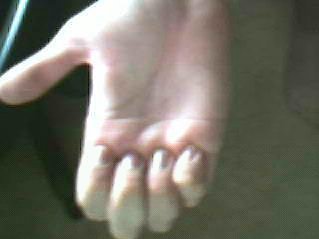
Then the 2nd stage of clenching is done:

Then finally the 3rd stage of clenching is done:
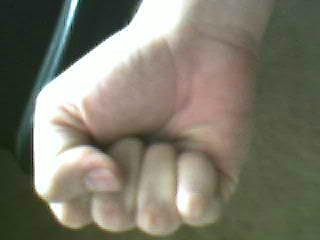
The thumb should be clenched against the knuckles so that it is flush to the top, also the tip of the thumb should be halfway down the second finger. Forming the fist in this manner then helps develop the famous Weng Shun Kuen grab. Developed further in the Bil Jee.
Note on clenching: The emphasis is on the fist as indicated. This method of clenching the fist develops all manner of hand techniques in preparation for Bil Jee.
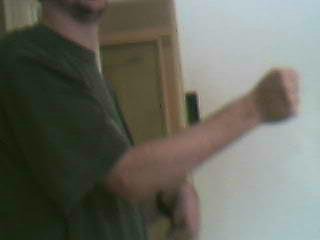
Once the hands have been properly formed into a fist the hands are pulled back into position so they are a finger distance from the sides. The forearms should be parallel to the ground. The shoulders should be rounded; this should cause the fist to protrude a little from the front of the waist, it should also cause the elbows to be slightly wider than the fists. The rounding of the shoulders is paramount as it augments relaxation (sung).
Important: All students should follow this procedure every time they stand in the Yee Jee Keem Yeung Ma, until they are at the Chum Kui level; otherwise the students tend to “jump” into an ill formed stance.
The Inside and Outside Vertical Straight Fist Punch
Inside
The left fist is brought into the centre as in the Sil Lum Tao about four inches from the chest. The knuckles of the fist should line up with the centreline supreme. The fist is cocked at the wrist so that the fist is turned down until sufficient tension is felt (not to be forced). The fist is now prepared as a spring as it has tension both ways. The action of the punch is to release that tension down the centre, this action, realised at the end of the punch, naturally straightens the fist into a vertical action. The punch should be fully extended. The punching area is the bottom 3 knuckles but the focal point is between the knuckles of the middle finger and ring finger.
As the punch exists straight down the centreline, the power comes from the relaxed (sung) release and the elbow snapping into the centre. Important: The elbow must be in a sung state (a relaxed state). To enable the snap to complete without waver, the shoulder must be the corrector. The shoulder must be steadfast as the elbow snaps.
The punch should be parallel to the shoulder in accordance to the Sil Lum Tao, but when air-punching it will be at the practitioner’s nose height.
With air punching training it is not the habit to tense the fists closely on proper extension the clenching occurs on impact.
Note: The arms should be maintained at the end of the punch through the centreline is to defend against simultaneous attack by the opponent through the centreline.
Outside
Prepare in Yee Jee Keem Yeung Ma. The right fist is brought into position as in the Sil Lum Tao. The fist corkscrews in, so that when it reaches the centre, it is vertical and continues to travel down the centre as before. The action of the punch is to release that tension down the centre. This action, realised at the end of the punch, naturally straightens the fist into a vertical strike. The punching arm should be fully extended. The punching area is the bottom 3 knuckles but the focal point is between the knuckles of the middle finger and ring finger.
As the punch exists straight down the centreline, the power comes from the release and the elbow snapping into the centre. Important: The elbow must be in a relaxed (sung) state. To enable the snap to complete without waver, the shoulder must be the corrector. The shoulder must be steadfast as the elbow snaps and locked into the stance.
The punch should be 90 degree’s to the shoulder in accordance to the Sil Lum Tao, but when air-punching it should be at the practitioner’s nose height.
Note: The inside vertical straight fist punch ‘teaches’ the outside vertical straight fist punch the centreline.
breathing:
Air is taken into the lower part of the lung (making the belly expand promoting the tan tien ) when the punch is pulled back. The air is breathed in through the nose, and forced out of pursed lips (to prevent the throat from drying) as the punch is released. The punch causes the breathing. The breathing promotes the punch until they are one. Only expel two-thirds lung capacity, retaining one third.To create a snapping action, the fist is brought back promptly to form a triangle.
Speed:
Build up speed slowly: be more aware of form.
Two Punches:
Execute the inside left vertical straight fist punch from the basic preparatory position. bring the right fist to the middle of the chest strike forward along the centreline. As the left fist is dropped sufficiently to allow the right hand to pass over whilst retracting. The left hand only returned when right is in close proximity. This exercise will apply to the outside vertical straight fist punch.The extended arm retracted after the punch forms a triangle with the shoulder, elbow and fist. The triangle is to be large at first but as advancement occurs it is thus reduced to suit the snapping action of the individual. Once achieved the triangle is straightened into a second punch (breathing as before).
The Scapula
The next dimension is to add the retraction of the scapula to the punch. Promoting incredible spring power to the overall projection.
Scapula Qi Gong
Stand in Yee Jee Keem Yeung Ma. Make sure the hands are in wu chi. bring the hands up to a position 90 degree from the shoulders making sure they are a fist distance apart. Proceed to pull both of your scapulas back and hold it there. breathing should be in through the nose and out through the mouth. Hold for as long as possible Begin with short periods and extend with practise.
Adding the Scapula to the Punch
When your punch is cocked, pull your scapula back and punch. As you punch, release the scapula. Allow the extension to flow rather than in separate stages: The punch therefore begins with the scapula and ends with the wrist released upward at the end of the punch.
Focus Work
When the technique is basically understood, pair off and practice focus. The shoulders of the recipient are pulled back as in the scapula Qi Gong. The gaze is at the ‘triangle’ of the other person’s body, that is to say shoulder tip to shoulder tip to the top of the head, but don’t look at it fixedly. Important: never look at the eyes. The attacker should also be looking at the triangle and should be punching so that the punch is 1cm to touch distance from the target (depending on level of advancement).
Intercepting Fist Two Man Drills
Both begin in the basic position. The attacker uses the inside vertical straight fist punch. Which is defended by the outside vertical straight fist punch. This is first practised on one side then the other. The technique is that the defending outside vertical straight fist punch comes into the centre as before described, catches the attackers punch, deflects the punch and continues onto the target.
The reverse of this is the attacked uses the outside straight fist vertical punch and in turn the defender uses the inside vertical straight fist punch.
Note: The defending punch is not a block per se; it simply comes into the centre “sticks” to the attacking punch, and then slides along the arm to strike.
When sufficient time is spent repeat on the other side.
Finally execute in an alternate manner.